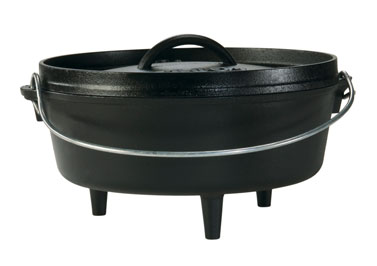
When purchasing a dutch oven, you want to get a high quality oven. Unlike other things in life, Dutch ovens don't wear out. If you take good care of your Dutch oven, it will last you a lifetime. And beyond.
What to Look For
 When shopping for a Dutch oven, there are seven things that you want to consider, and look for: Material, Kettle, Lid, Legs, Bail, Size, and Seasoning.
Material
Dutch ovens come in two different materials: aluminum and cast iron. Unless you are going on a backpacking trip, or some other activity where weight is a serious concern, get a cast iron dutch oven. Cast iron dutch ovens hold and distribute the heat much better and last much longer. They are easier to cook in and are what most of the Dutch oven pros use.
Almost always, when dutch ovens are being discussed, they are talking about cast iron dutch ovens. That said, other than being lightweight, the only other significant advantages that aluminum has over cast iron is that they don't rust, and may be a bit easier to clean. But to get started, you'll want to get a cast iron dutch oven.
Kettle
Cast iron dutch oven kettles are fairly thick and if you are buying an off brand locally, you'll want to check to make sure that the sides are roughly the same thickness all the way around. Significant differences in thickness are a warning sign of inferior products and are more likely to warp or crack, and will cause hot or cold spots.
Make sure that the dutch oven doesn't have any cracks or other major flaws. Some inconsistencies in texture or thickness are ok, but shy away from anything else.
Lid
For cooking with coals, you need a lid that is relatively flat and has a rim or flange around the edge. This prevents the coals from falling off the top (yes, sometimes you need to have coals on top of the dutch oven) and, perhaps, more importantly, helps keep ash from falling into your food when you take the lid off. So make sure you don't get a dutch oven with a domed lid.
It can also be handy if the inside of the lid is curved, as that gives you some versatility to put the lid upside down in the coals and use it is as a griddle. The lid should have a molded handle in the middle, with a hollow space that allows a lid lifter to be used to remove and replace the lid. Don't get a dutch oven that has a riveted handle.
Bail
The bail is the wireloop that attaches to each side of the Dutch oven and allows it to be lifted onto and off the fire, or hung over the fire. It should be made of heavy gauge wire, since a Dutch oven, with food in it, can be somewhat heavy. Thin wire won't do the trick.
Where the bail attaches on each side of the dutch oven should also be a molded part of the oven, and not riveted on (these can rust or break). It's nice if the bail can stand on its own at a 45 degree angle as it is moved from one side of the dutch oven to the other.
Legs
Get a dutch oven with legs and not one with just a flat bottom. Legs help keep the dutch oven off the coals, making it easier to cook and to add coals underneath the oven. Make sure the legs are strong, at least 1" long, never cracked or bent. If you have legs that are too thin, particularly where they attach to the bottom of the oven, they can actually punch through the bottom of a dutch oven, given enough weight on them.
The legs also allow you to stack dutch ovens, so as you improve and do much more dutch oven cooking, you can save coals by stacking dutch ovens one on top of each other, with coals in between. The coals heat the top of one dutch oven and the bottom of the other.
Size
Dutch ovens come in many sizes and shapes. For your first dutch oven, get a 12" Dutch oven. This will allow you to cook a variety of dishes for your family and will help you get started. As you get more comfortable, you can get other sizes to allows you to cook even more dishes and for larger groups.
Seasoning
Dutch ovens have to be seasoned before they can be used. Dutch ovens used to be shipped with a wax coating to keep from them from rusting. The wax coat had to be washed and scraped off and then the dutch oven heated and shortening applied to the oven, sometimes several times, before it could be used. This was a bit of a process that took some time, and, if done indoors, stunk up for your house for awhile.
Now there are some companies that have figured out how to preseason their dutch ovens using a method that may be even better than what you could do at home. If you were to neglect your dutch oven, you might need to reseason it, but for your first dutch oven, there's no reason not to go with a pre-seasoned dutch oven.
That's it for the things that you you need to know about selecting a dutch oven. The next article will be about where to buy a dutch oven. See below for all the articles in this series on Getting Started with Dutch Oven Cooking:
- Getting Started with Dutch Oven Cooking - What to Look For in a Dutch Oven
- Getting Started with Dutch Oven Cooking - Buying a Dutch Oven
- Getting Started with Dutch Oven Cooking - Seasoning a Dutch Oven
- Getting Started with Dutch Oven Cooking - Where to Cook With a Dutch Oven
- Getting Started with Dutch Oven Cooking - Cooking with a Dutch Oven
- Getting Started with Dutch Oven Cooking - Dutch Oven Accessories
- Getting Started with Dutch Oven Cooking - Easy Dutch Oven Recipes
- Getting Started with Dutch Oven Cooking - Cleaning a Dutch Oven
- Getting Started with Dutch Oven Cooking - Dutch Oven Cookbooks
- Getting Started with Dutch Oven Cooking - Online Dutch Oven Resources
Be sure to sign up for the Outdoor Cooking Magic Newsletter to be notified when the next article is ready!
And if you have any suggestions or comments on what you look for in a dutch oven, please share those with us in the comments below.


1 pings
[…] see what else you should check before buying a dutch oven, see What to Look For in a Dutch Oven in the Getting Started with Dutch Oven Cooking series. Share this:TwitterFacebookLike this:LikeBe […]