I originally had an article here that had been provided to me and talked about how to bbq ribs. As Dave pointed out in the comments below, while it may have been a way to cook ribs, it definitely was not bbq! Boiling, using a crockpot, and other such methods don't hack it when it comes to bbq.
 Since then, I have done ribs many times and while I would hesitate to see that I've mastered them, they are much, much better than when I first started. I've updated this article to tell you exactly how I do ribs now. I'll probably still experiment some, but this is my tried and true method. I'd love to hear your comments on how you barbecue ribs, so please leave a comment below.
I barbecue ribs in four stages, including the prep, and use what many people call the 3-2-1 method. Let's look at each of those stages.
Preparing Ribs for Barbecuing
The first thing that you have to do is to remove the membrane on the back of the ribs. Flip the ribs over and you'll see a light colored covering on the back of the ribs. Use a table knife, screwdriver, or other such blunt instrument to work between the membrane and the meat. Separate it enough that you can get a finger in there and then pull up. I find that I usually need to use a paper towel to grasp the membrane and pull it all off. Removing the membrane will help get more flavor into your ribs.
Next, I rub mustard all over the ribs. Squirt some one and use one hand to rub it all over the ribs, top and bottom. This may seem a bit strange, but you won't taste the mustard in the end, I promise. The mustard gives something for the rub to stick to and also helps tenderize the ribs (I remember that my mom said she had a recipe for a roast that called for putting mustard on the outside--helped tenderize it).After you have spread the mustard, apply your favorite rub. You can make your own or get a rub from your local store. The only problem with getting one from the store is that I like to apply the rub generously. That's a bit easier to do when you have plenty of rub, which I would have if I made it myself. But you can certainly buy enough from the store to apply generously.
After you apply the rub, wrap the ribs in plastic wrap and let them sit in the fridge overnight.
Here's a rub recipe that I've used and really like. It some from the folks at Outdoor Cooking. I make enough to cover the ribs generously, as I said. One batch should do 5-7 rib racks.
Rib Rub Recipe
1/2 cup onion powder 1/2 cup garlic powder 1/4 cup paprika 1/4 cup kosher salt 1/4 dark brown sugar 2 Tbsp chili powder 1 Tbsp cumin 1 Tbsp black pepper 1 Tbsp saltMix the ingredients together and apply to your ribs.
Stage 1 of 3-2-1
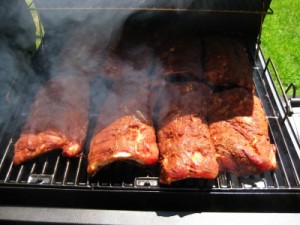
This first stage is where you get most of the smoky flavor into your ribs. Get your ribs out of the refrigerator and get your smoker fired up. If it is charcoal based, then get your charcoal going and then add to your smoker. If you have an electric smoker, get it turned on and heating up. You'll usually want to add a pan of water to the bottom to help give moisture as you smoke your ribs. Put your ribs on the smoker. Add some wood chips to get that smoke going.
As far as wood chips go, I like to use a mix, usually hickory plus either apple or cherry. You can experiment to see what you like. Soak the chips for an hour before you add them.
Watch the temperature and make sure that it is around 200 degrees. The key to barbecue is too cook low and slow. During this first stage, you rare going to cook the ribs for at least 3 hours. That's the '3' part of the 3-2-1 method. I personally have found that I like how the ribs turn out when I cook them a bit longer at this stage. And it all depends on what the temperature of your smoking chamber is. So you may need to experiment a bit. Ideally the ribs start to pull back from the bone just a bit, maybe a quarter inch or so.
During this stage, you'll need to add some briquets every hour along with some wood chips.
Stage 2 of 3-2-1
After your first stage is over take each rack off the grill and lay it on a sheet of foil. Spray the ribs with apple juice. This is one of the secrets of great ribs, I think! Spray them generously. Wrap them tightly in the foil and return to the smoker. Cook for two hours. The heat can come up a bit during this stage, as you are trying to get the apple juice to steam the ribs a bit and add a wonderful flavor. The steaming will make your ribs very tender.
There is no need to add wood chips during this stage, since the ribs are in foil. But make sure the heat stays up. You need the juice to turn to steam, so you'll want it at least 220 degrees and you can even go a bit higher.
Stage 3 of 3-2-1
The third stage of the 3-2-1 method is where you would apply barbecue sauce if you wanted it. Remove the ribs from the foil and return to the smoker. Apply barbecue sauce if desired, although it is not necessary. You can serve on the side. I do like to add wood chips to the coals in this stage. I think it gives a last extra boost of smoky flavor. After an hour, your ribs are ready to cut into sections and serve to your guests.
That's it! Pretty simple, although it does take time. But your guests will rave over your ribs. I just cooked about 50 lbs of ribs this way for a group. They turned out great.
If you have suggestions or want to let us know how you do ribs, feel free to leave us a comment.


4 comments
Skip to comment form
Oven, Boiling, Crockpot, Gas Grill ? ? Hardly BBQ. Smoke ribs for 3 hours @ 160 deg. then raise temp 225 deg. for 2 hours wrapped tightly in foil with apple juice or bbq sauce . after 2 hours remove from foil. and return to grill for about an hour. baste with BBQ sauce and allow the ribs to tighten. They will be fall off the bone good and moist. cook with indirect heat. smoking at 160 deg. to 180 Deg. renders the fat and sets the smoke flavor.
Author
Dave, I am so embarrassed! I forgot I have this post on the site. I originally got it from someone else when I started the site. I hadn’t ever done ribs at that point. You are absolutely right and I don’t do ribs this way either. My way is pretty close to yours. I’ll be updating this post soon with the real way. In fact I just got done smoking about 45 lbs of ribs spread over a couple of days for a big crowd that was coming to my house. They turned out great and everyone loved them. Thanks for catching my error.
I followed this recipe and my ribs turned out great! My first time grilling ribs! So juicy and tasty! Thanks!
Glad they turned out so good!